Digital technologies/3D printing/3D printing- Intermediate
This page will focus on intermediate 3D printing skills. You should be familiar with 3D Printing- Beginner before continuing.
Types of printers
Printers
There are many different types of 3D printers that exist. Theses printers can be primarily categorized into 7 categories:
- Material Extrusion
- Vat Polymerization
- Powder Bed Fusion
- Material Jetting
- Binder Jetting
- Directed Energy Deposition
- Sheet Lamination
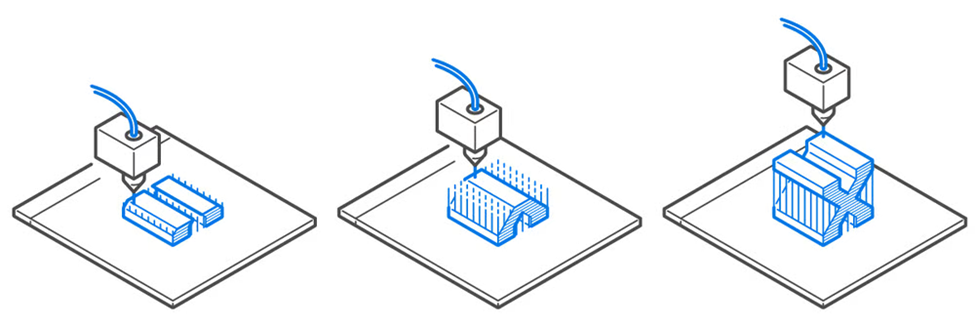
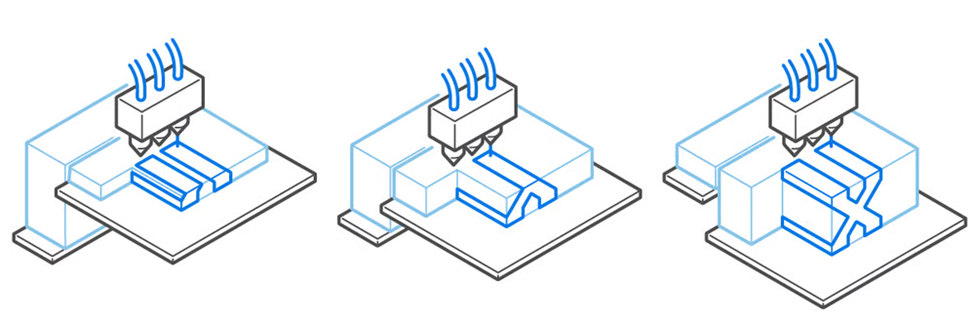
Material extrusion is the most commonly used 3D printing method. It refers to 3D printing where the material is extruded through a nozzle on to a build plate in a pre-determined path and the material solidifies into a solid object. Typically, the material used are plastic such as PLA and ABS. It is usually the most cost-effective 3D printing option, however, it does not provide the best dimensional accuracy. The material properties of printed object is also not that great compared to other methods. The FDM printers in Makerspace are a good example of material extrusion 3D printing.
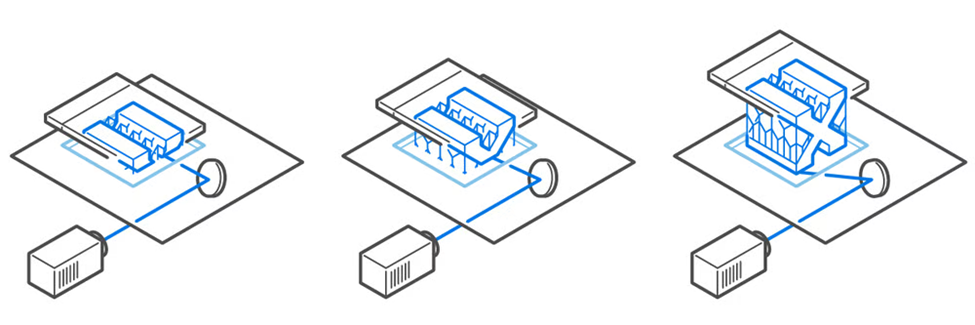
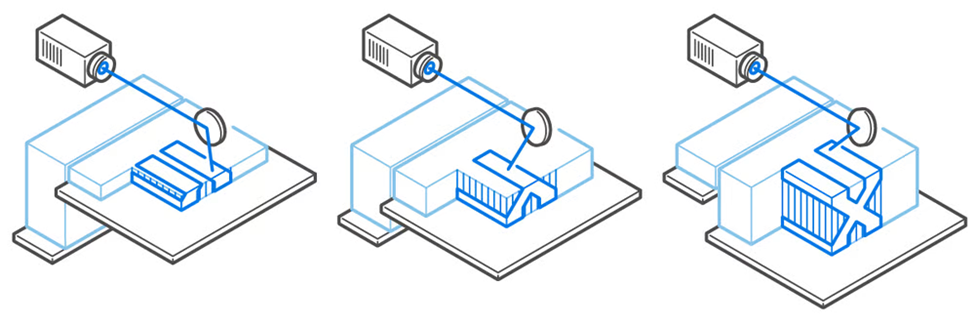
Vat polymerization also known as resin 3D printing uses a light source to selective cure photopolymer resin in a vat. The build plate is moved vertically once the first layer of the print is cured. This is done layer by layer until the entire object is built. After the printing process, the object is cleaned of the remaining liquid resin and cured to ensure the mechanical properties of the part. The most common form of vat polymerization is stereolithography (SLA).
SLA is the oldest form of 3D printing technology. SLA printers use mirrors known as galvanometers with one on the X-axis and one on the Y-axis. The galvanometers aim the laser beams across a vat of resin, curing and solidifying a cross-section of the object inside the building area. Resin 3D printing allows for smoother surface finish with finer feature details. Makerspace offers resin 3D printing through Elegoo printers.
Other forms of resin printing include digital light processing (DLP) and liquid crystal display (LCD). DLP 3D printing uses a digital light projector instead of a laser beam like SLA printers. The digital projector screen flashes an image of a layer across the platform. This cures all points simultaneously. LED screens or a UV source is used to project light onto the resin. This light is directed to the build surface by a digital micromirror device (DMD). LCD 3D printing is also called masked stereolithography (MSLA) is similar to DLP above. Instead of a DMD, LCD printers uses an LCD screen. LCD is a newer technology designed to be an affordable alternative to DLP and stereolithography. It cures an entire layer of resin at once using an array of ultraviolet LED as a light source. It uses an LCD to selective mask UV light so that only selected areas are cured.
Powder bed fusion printers spread a thin layer of powdered material over a print bed which is melted (typically by a laser). This process is repeated with the powder layer fusing at specific points with the previous layer until the object is completed. The final product is encased and supported in unfused powder. This method is great for parts with complex geometries however it has a higher machine cost with higher material cost. It often results in slower build rates.
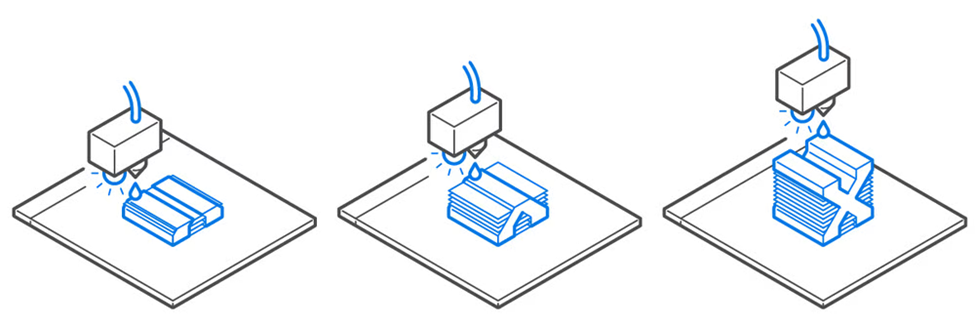
Material jetting involves tiny droplets of material that are deposited onto the build plate. The droplets are cured when exposed to light. This process is repeated layer by layer. This process allows for different materials to be printed in the same object. It can create textured surface finish. However, the process has limited materials and often have weaker mechanical properties with a higher process cost.
Binder jetting uses a liquid bonding agent that selectively binds layers of powder together. The printer nozzle will pass over the print bed and selective deposit droplets of binding agent on the powder layer. This process combines powder bed fusion and material jetting.
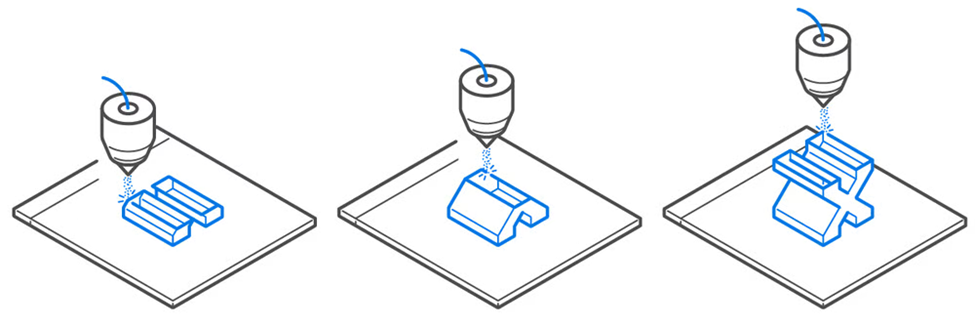
Directed energy deposition is a process where material is fed and fused at the same time as it is deposited. This is typically only performed on metal material. It is very similar to welding. This process is often used to repair or add features to metal objects by printing on pre-existing metal objects.
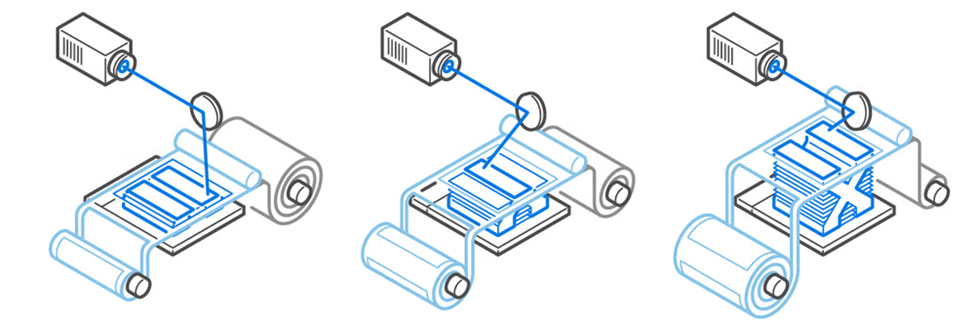
Sheet lamination is technically considered a form of 3D printing. However, it differs significantly from the other methods mentioned above. It stacks and laminates sheets of very thin material together to produce a 3D object. The stack can also be cut mechanically or by lasers to create the final shape. There are many ways fuse the material layers such as heat and sound. Since material is fused together then cut, this way of 3D printing generates much more waste than other technology.
Each brand of printer will have a different slicer and way of starting the prints which is explained in the following sections.
Slicers
There are many different slicers that can be used. Typically each 3D printer company will have its own 3D slicer software. For example, within Makerspace Ultimaker Cura is the typical slicer used for the Ultimaker printers. Other slicer software used within the Makerspace includes MakerBot Desktop for the MakerBot replicator, Dremel Idea Builder for Dremel printer and Eiger for Markforged printer.
MakerBot Desktop is used for the MakerBot Replicator printers in Makerspace. Since the MakerBot replicators are discontinued printers so the slicer software is no longer updated. To used the MakerBot Desktop to print follow the steps below:
- Open MakerBot Desktop.
- Click add a file.
- Select the printer. Ensure the correct printer is selected. In Makerspace we have the Replicator 2 printers. Click on “Device” on the top menu. Then “Select type of device”, where Replicator 2 would be selected.
- Send the file to the printer. There are two ways to do so, using a SD card or a USB cable.
- SD Card: Click on “Export print file”. Replicator printers will only work with 2GB SD cards (or smaller). SD cards with a greater storage capacity will give you an “SD card read error”.
- USB Cable: Connect the printer with your computer using a USB cable. A printer should show up at the bottom of your MakerBot Desktop screen. Click “Print”. Once the “Print” has be clicked, the compute cannot be unplugged from the printer.
Eiger is the slicer used for the Markforged printers in the space. Eiger is a web-based slicer software. You will need to be invited into the Makerspace organization and make an account with Eiger. Once you have logged in, follow the steps below to slice your print.
- Click on the Import a File icon and import your STL model file.
- Open the part file.
- Adjust the print settings to your desired options.
- Once you are ready to print, click on “Build View”.
- Select “Mark Two” as the printer.
- Click on “Print”.
Dremel = Dremel Idea Builder
- Load your .stl file by clicking the load button on the menu on the left hand side. You can modify your object (scale, move, or rotate) using the buttons on the left hand side
- Click build.
- Select your settings and your method of printing. Either using an SD card or a USB cable.
- SD card: You are saving the machine to an SD card and moving the SD card to the printer
- USB cable: You are using a USB wire to transfer the fire to the printer. What is nice with the Dremels is the file is downloaded to the machine. Therefore you can unplug the wire when the file has transferred.
Start the print
Starting your print is very simple. Simply save your file to an SD card or connect your computer to the printer and click print or build.
Dremel
If you are using a USB cord, the print with start automatically when you hit build in on your computer. Follow the following step if you are using the SD card.
- Place your SD card in the SD card slot in the 3D printing. This is found on the right hand side near the front of the printer.
- If the 3D printer is not already on, turn on the printer using the on/off switch located at the right hand side near the back of the printer.
- Using the front screen, press build ->The picture of an SD card ->select your file -> Build.
Custom Slicer Settings as an Intermediate User
This section is under construction. If you want more information on the print settings available in Cura, check out the Cura documentation on Ultimaker's website.
This section covers how to modify parameters as well as which parameters are tunable and why they may be important.
How to Modify Parameters
Tunable Parameters
The following parameters can be tuned using the previously stated method.
Print Speed
The ways in which the print speed will affect the final print are not always obvious. If the print speed is too high, the printer might not be able to dispense enough material through its nozzle per unit of time to fill the desired volume with the required amount of material. This can lead to bad adhesion between layers or even a complete lack of adhesion to layers. The ratio of layer height to layer speed (i.e.: material outflow through the nozzle) should therefore always be considered when FDM printing (the exact subject though being more of an intermediate subject). When making parts that will bear loads, print speeds are increasingly important as layer adhesion becomes an important factor in the strength of the final part, so much so that parts may be annealed (uniformly re-heated through a controlled process) to obtain better properties across layers.[1]
Dual extrusion
Print Orientation
Post-Processing 3D prints
Bed Levelling, Filament Change
Bed Levelling
If the printer is not printing properly (especially if the issue is noticeable on the very first layers of the print, where a difference in the ), the build plate level may need to be adjusted. For minor adjustments, this can be done by using the three knobs (thumb screws) on the underside of the plate. For more major adjustments (>1mm), the build plate should be leveled through the printer’s onboard software by going to Maintenance→Build Plate, and following the onscreen instructions. If unsure, always use the latter method.
Filament Change
To change the filament on an Ultimaker 2+ printer, go to Material→Change in the printer’s user interface and follow the onscreen instructions. If ever the filament has almost run out, or if you desire to change the colour of a print midway, you may navigate to Pause→Change Material and following the onscreen instructions. If changing mid way, it is recommended that the older filament be completely purged from the nozzle using the new filament. Otherwise, the result will not be good.
Selecting Nozzle Sizes
References
- ↑ Agnieszka Szust, Grzegorz Adamski, Using thermal annealing and salt remelting to increase tensile properties of 3D FDM prints, Engineering Failure Analysis, Volume 132, 2022, 105932, ISSN 1350-6307, https://doi.org/10.1016/j.engfailanal.2021.105932.
