Digital technologies/Textiles/Embroidery- Beginner: Difference between revisions
m Jboud030 moved page Embroidery to Digital technologies/Textiles/Embroidery- Beginner without leaving a redirect |
Added a bunch of pictures that needed to be added as well as informative sections |
||
| Line 1: | Line 1: | ||
Throughout this section we clearly identify what an embroidery machine is, what it does, how it can be used, different applications, the different kinds, and much more. The main goal is to familiarize yourself with the machine by taking you through the entire process step by step. Firstly, we are going to show you how to use the dedicated software (PE-Design), then once you have a design you are satisfied with, we will then show you how to upload and start your embroidery project. We hope to open your eyes to a new engineering skill that may be of use in your future career. | |||
==What is embroidery== | ==What is embroidery== | ||
[[File:Embroidery-close-up.webp|thumb|[https://www.tree64.com/embroidery Embroidery close-up]]] | |||
Embroidery is the process of adding thread to a cloth to add a pattern or image. Using an embroidery machine, you can write text with thread on cloth surfaces or draw images to make logos or patches! You can also embroider different colours by layering. | Embroidery is the process of adding thread to a cloth to add a pattern or image. Using an embroidery machine, you can write text with thread on cloth surfaces or draw images to make logos or patches! You can also embroider different colours by layering. | ||
| Line 7: | Line 10: | ||
==Creating an embroider design== | ==Creating an embroider design== | ||
Embroidery designs can be made using either | Embroidery designs can be made using either PE-design next 9 or ink/stitch. The two options are great software’s to use and are about the same difficulty in learning. | ||
===PE-DESIGN NEXT 9=== | ===PE-DESIGN NEXT 9=== | ||
This method is easier to use, however it gives the user less control over the results if you want to import pictures. The program is found on the computer attached to the sewing machine. | This method is easier to use, however it gives the user less control over the results if you want to import pictures. The program is found on the computer attached to the sewing machine. | ||
[[File:PE-design.png|thumb|407x407px|PE-design interface]] | |||
#Begin by creating a new file | #Begin by creating a new file | ||
| Line 21: | Line 25: | ||
===INK/STITCH (Inkscape Extension)=== | ===INK/STITCH (Inkscape Extension)=== | ||
This is a free and open source way to create embroidery designs. It also gives the user more control and detailing from imported pictures, however it is more complicated to use. You can find the extension on their website at https://inkstitch.org/ along with information on how to download and install it. They provide tutorials for different functionalities too. If you don't have Inkscape installed on your computer, you can install in at https://inkscape.org/. | This is a free and open source way to create embroidery designs. It also gives the user more control and detailing from imported pictures, however it is more complicated to use. You can find the extension on their website at https://inkstitch.org/ along with information on how to download and install it. They provide tutorials for different functionalities too. If you don't have Inkscape installed on your computer, you can install in at https://inkscape.org/. | ||
[[File:Ink.stitch.png|thumb|400x400px|Inkscape with stitch extention]] | |||
#Create a new document on Inkscape. | #Create a new document on Inkscape. | ||
#Ensure that your document's page size is less than 4" x 4" as that is the maximum embroidering area. | #Ensure that your document's page size is less than 4" x 4" as that is the maximum embroidering area. | ||
| Line 35: | Line 39: | ||
There is a wonderful tutorial on using Ink/Stitch to make satin stitching on https://edutechwiki.unige.ch/en/InkStitch_-_satin_columns from the University of Geneva. | There is a wonderful tutorial on using Ink/Stitch to make satin stitching on https://edutechwiki.unige.ch/en/InkStitch_-_satin_columns from the University of Geneva. | ||
[[File:Satin stitch.png|thumb|Satin [https://www.thesprucecrafts.com/how-to-work-basic-satin-stitch-1177555 stitch]]] | |||
NOTE: If you are making a satin stitch from a few lines on the same path, occasionally the default parameter will be to satin stitch the individual lines separately with very loose zig-zag pattern despite following all the steps in the wiki above. Uncheck "Lines to Satin" to solve this problem. | |||
== Different kinds of Embroidery machines == | |||
There are 2 different types of embroidery machines that other you may find other ones categorized under, the free-motion embroidery machine, and the computerized embroidery machine. In both types of machines, we can find many pros and cons, whether it’s the cost, required time, complexity, etc. | |||
=== Free motion === | |||
For the case regarding the free-motion embroidery machines, we typically require a fair bit of hands-on work. However, we will typically find these machines doubling as a sowing machine to increase its resourcefulness. The machine works by moving a tightly banded piece of fabric along the horizontal plane beneath the needle. The needle will then piece through the fabric wile the fabric is moving to achieve the desired design. On this machine, the user must operate the machine using various building settings so that the fabric stays tight therefore, achieving the highest quality result. With this kind of machine there is only one needle the operator must stop the machine and interchange the thread for every different color desired in the design. This can be very time consuming. | |||
=== Computerized === | |||
In modern embroidery machines we can see a lot more automation in this process. The embroidery machine comprises a frame that holds the fabric in tension, then the sewing needle moves automatically using the preprogrammed design as its guide. The machine can switch between different integrated needles to obtain different colors in the embroidery design. Within these machines there are many different needles which make it a great tool for the industrial market. These machines require no hands-on manipulation other than the initial threading of the needles. Since the machines are fully automated, this makes for a significantly faster process. | |||
==Using the Embroidery Machine: Brother HE240== | ==Using the Embroidery Machine: Brother HE240== | ||
The embroidery machine is very finicky and needs everything to be right to operate properly. | The embroidery machine is very finicky and needs everything to be right to operate properly. | ||
[[File:Machine.jpg|thumb|Brother HE240]] | |||
'''Precautions before use:''' | '''Precautions before use:''' | ||
| Line 76: | Line 88: | ||
Note: It is advised that you use thread meant for embroidery. It would say embroidery on the spool, this yields higher quality results. | Note: It is advised that you use thread meant for embroidery. It would say embroidery on the spool, this yields higher quality results. | ||
[[File:Threading the machine.png|thumb|[https://support.brother.com/g/b/manualtop.aspx?c=ca&lang=en&prod=hf_he240eus Threading the machine]]] | |||
'''Now we are using the steps that are on the machine.''' | '''Now we are using the steps that are on the machine.''' | ||
| Line 93: | Line 105: | ||
The bobbin is found in the bottom of the machine and needs to be refilled every time it runs out, otherwise the machine will not sew, and an error message will pop up on the machine's screen. | The bobbin is found in the bottom of the machine and needs to be refilled every time it runs out, otherwise the machine will not sew, and an error message will pop up on the machine's screen. | ||
[[File:Rewinding the bobbin.png|thumb|[https://support.brother.com/g/b/manualtop.aspx?c=ca&lang=en&prod=hf_he240eus Rewinding the bobbin on the Brother HE240]]] | |||
If the bobbin is empty, you must follow the steps on rewinding the thread onto the bobbin. | If the bobbin is empty, you must follow the steps on rewinding the thread onto the bobbin. | ||
| Line 109: | Line 121: | ||
==Setting up the Print Bed== | ==Setting up the Print Bed== | ||
Take the plastic hoop off the embroidery machine: | Take the plastic hoop off the embroidery machine: | ||
[[File:Setting up the fabric.png|thumb|272x272px|[https://support.brother.com/g/b/manualtop.aspx?c=ca&lang=en&prod=hf_he240eus Setting up the fabric]]] | |||
#Pull the metal tab | #Pull the metal tab | ||
#Pull upwards on the plastic hoop to remove it | #Pull upwards on the plastic hoop to remove it | ||
| Line 145: | Line 157: | ||
Press on the pocket. | Press on the pocket. | ||
[[File:Computer icon.png|left|thumb|224x224px|Pocket icon]] | |||
When you see this screen, it is ready to embroider. | When you see this screen, it is ready to embroider. | ||
[[File:Uploaded documents.png|left|thumb|236x236px|Uploaded documents]] | |||
==Making Adjustments to Size and Position== | ==Making Adjustments to Size and Position== | ||
| Line 154: | Line 173: | ||
===Changing the position=== | ===Changing the position=== | ||
Using the arrow keys you can easily change the position, rotate, or even mirror the desired design. | |||
[[File:Changing the position.png|left|thumb|440x440px|Changing the position]] | |||
===Changing the size=== | ===Changing the size=== | ||
[[File:Resizing buttons.png|thumb|342x342px|Resizing buttons]] | |||
When you are done making the adjustments, press the back button until you are back to design screen with your design on it. | When you are done making the adjustments, press the back button until you are back to design screen with your design on it. | ||
| Line 169: | Line 198: | ||
*Very sharp needle moving up and down | *Very sharp needle moving up and down | ||
*Mechanical parts are moving all over the machine, touching them will cause the embroider to fail. | *Mechanical parts are moving all over the machine, touching them will cause the embroider to fail. | ||
==Multi-Coloured Embroiders== | ==Multi-Coloured Embroiders== | ||
[[File:Multicoloured embroidery job.png|thumb|170x170px|Multicoloured embroidery job]] | |||
*If your design has different colours, you will need to rethread the upper thread with the next colour and hit the Go button again after lowering the foot. | *If your design has different colours, you will need to rethread the upper thread with the next colour and hit the Go button again after lowering the foot. | ||
*The machine will tell you which colour to embroider in what order on the screen: | *The machine will tell you which colour to embroider in what order on the screen: | ||
==Finishing up== | ==Finishing up== | ||
#When your design is finished embroidering the machine will tell you. Press okay then press then scissors button. | #When your design is finished embroidering the machine will tell you. Press okay then press then scissors button. | ||
#Raise the foot. | #Raise the foot. | ||
#Remove the hoop from the machine | #Remove the hoop from the machine | ||
#Loosen the screw on the hoop and take your embroidered design! | #Loosen the screw on the hoop and take your embroidered design! | ||
[[File:Finished job.png|alt=Scissor button|left|thumb|180x180px|Scissor button]] | |||
==Troubleshooting== | ==Troubleshooting== | ||
| Line 208: | Line 240: | ||
==Replacing the Needle== | ==Replacing the Needle== | ||
[[File:Replacing the needle.png|thumb|[https://support.brother.com/g/b/manualtop.aspx?c=ca&lang=en&prod=hf_he240eus Replacing the needle]]] | |||
#Bring up the foot by pushing up on the lever. (Very important) | #Bring up the foot by pushing up on the lever. (Very important) | ||
Revision as of 22:24, 14 July 2022
Throughout this section we clearly identify what an embroidery machine is, what it does, how it can be used, different applications, the different kinds, and much more. The main goal is to familiarize yourself with the machine by taking you through the entire process step by step. Firstly, we are going to show you how to use the dedicated software (PE-Design), then once you have a design you are satisfied with, we will then show you how to upload and start your embroidery project. We hope to open your eyes to a new engineering skill that may be of use in your future career.
What is embroidery
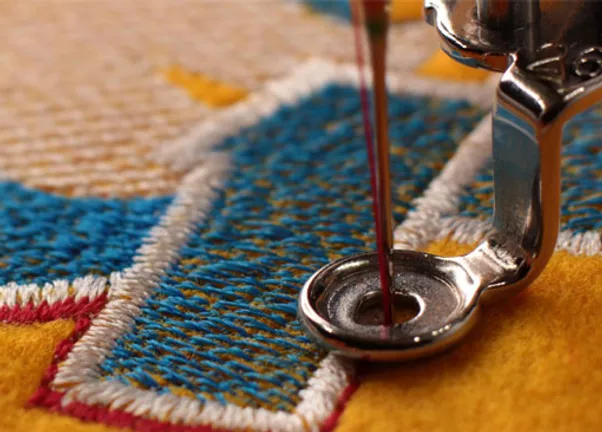
Embroidery is the process of adding thread to a cloth to add a pattern or image. Using an embroidery machine, you can write text with thread on cloth surfaces or draw images to make logos or patches! You can also embroider different colours by layering.
An embroidery machine looks like a regular sewing machine however it has a motorized bed that moves along the x-y axes with an automated needle.
It can embroider (print) only one colour at a time. Will have to replace the spool of thread each time you want a new colour.
Creating an embroider design
Embroidery designs can be made using either PE-design next 9 or ink/stitch. The two options are great software’s to use and are about the same difficulty in learning.
PE-DESIGN NEXT 9
This method is easier to use, however it gives the user less control over the results if you want to import pictures. The program is found on the computer attached to the sewing machine.
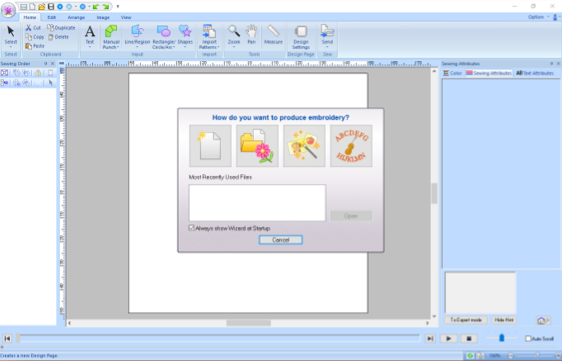
- Begin by creating a new file
- You can insert shapes into the work area (the big white box in the center) by selecting a shape and then holding and dragging to draw the shape you want. If you do not see the shapes button, switch over to the Home tab.
- Change the colours. Click on the shape then in the Attributes tab, then click on the spool and select the colour you want it to be in the side panel. You can do this too to change the colour of the outline. Note: Make sure all your colours are consistent throughout. (Don’t have 3 different shades of blue if you want the same blue throughout the print) The more colours you add, the longer it will take to embroider and more spool changes you will need to do.
- Changing Stitch Pattern. You can also change the stitch pattern in the attributes tab to get different effects to your design.
- Optimizing for Sewing Order. Since the embroidery machine can do only one colour at a time, it is important to optimize the file to do all the same colours at once. We can do this by grouping the same coloured layers together in the sewing order panel on the left.
- Finishing up. Save your work.Go to the Home tab. Plug in your machine to the computer. Send your design to the machine.
INK/STITCH (Inkscape Extension)
This is a free and open source way to create embroidery designs. It also gives the user more control and detailing from imported pictures, however it is more complicated to use. You can find the extension on their website at https://inkstitch.org/ along with information on how to download and install it. They provide tutorials for different functionalities too. If you don't have Inkscape installed on your computer, you can install in at https://inkscape.org/.
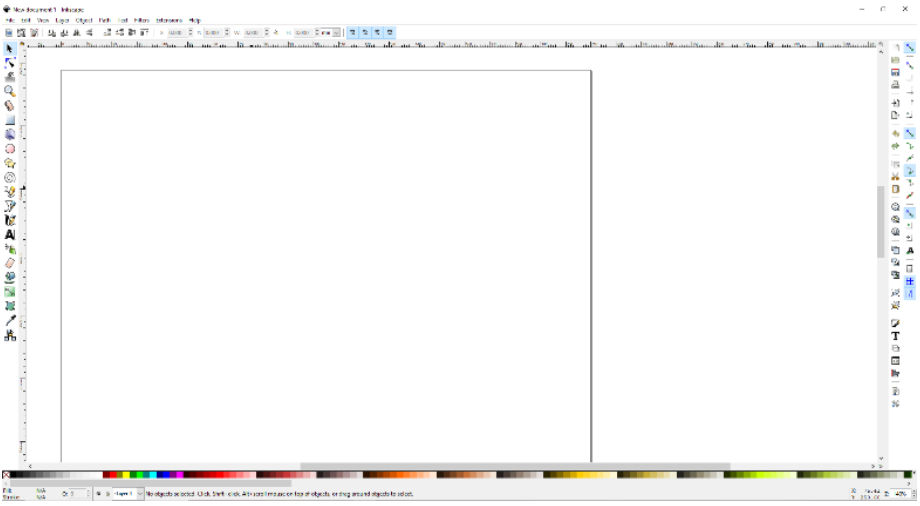
- Create a new document on Inkscape.
- Ensure that your document's page size is less than 4" x 4" as that is the maximum embroidering area.
- Draw any shapes or lines to make your picture. To use a picture you have, trace the bitmap of your desired image by right clicking your image and clicking "Trace Bitmap", then check "Live Preview" and adjust the settings until you're happy with the results. (NOTE: If your path has more than 1 distinct curve in it, break apart all the paths (Shift+Ctrl+K) to make it easier to manipulate the paths later.)
- If your shapes are filled in, they will do a fill stitch. You can also turn your shapes into satin stitches. You can change any parameters under Extensions > Ink/Stitch > Params. To change the colour of the fill stitch, click the colour you want to use at the bottom bar of the page. To change the colour of satin stitching, right click on the colour and click on the Line option.
- After making your file, you can simulate the path the needle will take. This takes a long time so it's easier to check only a portion at a time to narrow down any bugs that might be in your file.
- Save your file as a .pes file (as well as a .svg file to make any changes later on). Copy and paste the .pes file onto the machine drive (It should show up as being connected to a USB port). If it doesn't show up, it means your file is too large (width and height).
SATIN STITCHING IN INK/STITCH
Satin stitching gives a shiny finish to your embroidered piece, however it works best with smaller sections or lines.
There is a wonderful tutorial on using Ink/Stitch to make satin stitching on https://edutechwiki.unige.ch/en/InkStitch_-_satin_columns from the University of Geneva.
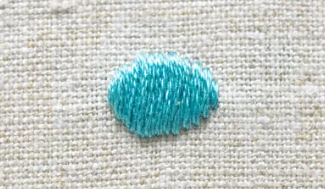
NOTE: If you are making a satin stitch from a few lines on the same path, occasionally the default parameter will be to satin stitch the individual lines separately with very loose zig-zag pattern despite following all the steps in the wiki above. Uncheck "Lines to Satin" to solve this problem.
Different kinds of Embroidery machines
There are 2 different types of embroidery machines that other you may find other ones categorized under, the free-motion embroidery machine, and the computerized embroidery machine. In both types of machines, we can find many pros and cons, whether it’s the cost, required time, complexity, etc.
Free motion
For the case regarding the free-motion embroidery machines, we typically require a fair bit of hands-on work. However, we will typically find these machines doubling as a sowing machine to increase its resourcefulness. The machine works by moving a tightly banded piece of fabric along the horizontal plane beneath the needle. The needle will then piece through the fabric wile the fabric is moving to achieve the desired design. On this machine, the user must operate the machine using various building settings so that the fabric stays tight therefore, achieving the highest quality result. With this kind of machine there is only one needle the operator must stop the machine and interchange the thread for every different color desired in the design. This can be very time consuming.
Computerized
In modern embroidery machines we can see a lot more automation in this process. The embroidery machine comprises a frame that holds the fabric in tension, then the sewing needle moves automatically using the preprogrammed design as its guide. The machine can switch between different integrated needles to obtain different colors in the embroidery design. Within these machines there are many different needles which make it a great tool for the industrial market. These machines require no hands-on manipulation other than the initial threading of the needles. Since the machines are fully automated, this makes for a significantly faster process.
Using the Embroidery Machine: Brother HE240
The embroidery machine is very finicky and needs everything to be right to operate properly.
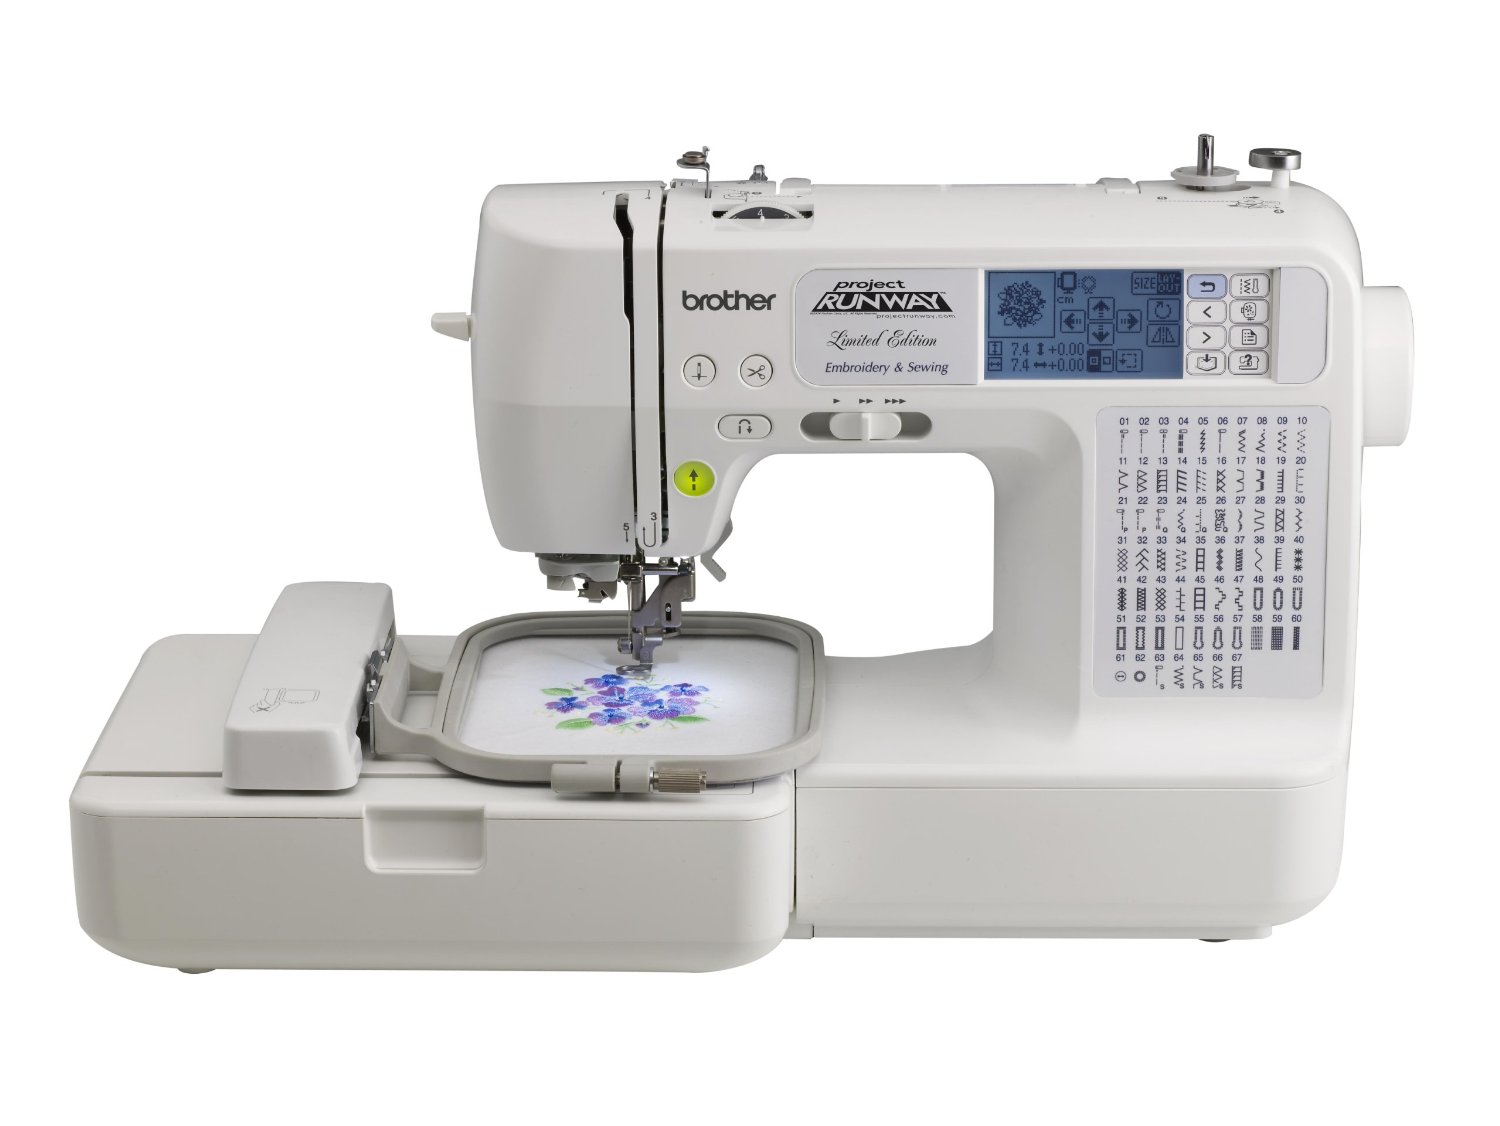
Precautions before use:
- Make sure you are using a 75/11 needle
- Make sure the embroidery attachment is installed
- Make sure the bobbin has a thread in it
- Make sure there’s nothing obstructing the way of the loop’s path
- Do not sew when there is no thread
- Do not sew when there is no fabric to sew on
- Be patient but have fun!
Operations checklist
Before operating the machine, you need to set it up to get it working. Make sure that:
- The machine is threaded properly and the thread is through the needle
- The bobbin is threaded with bobbin thread
- The foot is down
Turning on the machine
The power switch is found on the side of the machine.
You will be prompted a message after turning it on, hit OK
If the machine is not already threaded or is threaded with the wrong colour, follow the steps for threading the machine.
Threading the Machine
There are two pre-steps that come before those numbered on the machine.
- Insert the spool of thread into the long pin.
- Before threading, make sure the needle is in its highest position. If not, press the round button with a picture of a needle with a horizontal line through it that is underneath the Brother logo on the front of the machine. If the needle goes down instead of up, press that button once more.
Note: It is advised that you use thread meant for embroidery. It would say embroidery on the spool, this yields higher quality results.
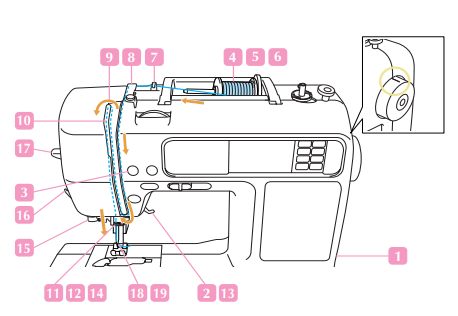
Now we are using the steps that are on the machine.
- Bring the string through the metal hook.
- Continue bringing it underneath the plastic piece. You can also see the visual guide on how to do this that is on the machine.
- Pull the thread down the side of the machine into the slot. Now take the thread and wrap it around the thin plastic U shaped part, pulling it all the way up.
- Keep pulling the thread up and then pull it toward the machine.
- Then pull the thread down, you will notice that it will latch onto the metal piece on the inside.Note: If the thread does not latch onto the metal piece, try again until it does.
- Make sure the needle is in the highest position, then pull down the thread and latch it to the hook above the need labelled
- Finally pull the string from the needle and cut off the excess length. (Leave about 10cm) That’s it for threading the machine!
Note: Do not pull the string out of the needle, only the excess part to cut it off
Rewinding the bobbin
A sewing machine needs a feed of thread from the bottom too. Otherwise the thread wouldn’t stay onto what you’re sewing on. You can see in the demonstration on the side how the bobbin role is important when it comes to sewing.
The bobbin is found in the bottom of the machine and needs to be refilled every time it runs out, otherwise the machine will not sew, and an error message will pop up on the machine's screen.
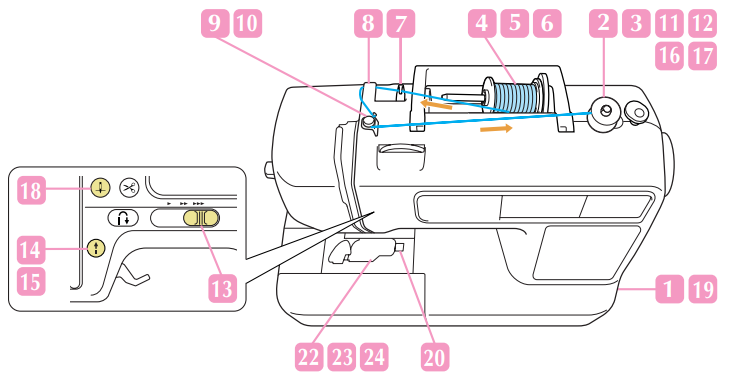
If the bobbin is empty, you must follow the steps on rewinding the thread onto the bobbin.
- Take the lid off the bobbin cover as the diagram shows, then take out the bobbin and remove any remaining thread from it. Place the bobbin in the bobbin winding tool as shown on the machine.
- Turn on the machine and place the bobbin thread spool in the thread holder of the machine. If the bobbin thread spool does not fit on the top, use the large spool holder near the station.
- Pass the thread under the hook then around the metal cylindrical part as shown.
- Then wrap the thread around the bobbin several times so it doesn’t come off or get loose. Make sure it is in this direction.
- The start button (The one with the arrow) should now be yellow, press it and it will start winding the thread around the spool. Once it’s nearly full, press the yellow button again to stop it.
- Push the bobbin the other way as show and take it off the winder. Your bobbin is now refilled!
- Take the lid off the bobbin as you did before. Take the end of the thread
- Take the end of the thread and place it under the plastic tab.
- Then take the thread and loop it in around the plastic grove as shown.
- Once done, put the cover back on and push it in.
Setting up the Print Bed
Take the plastic hoop off the embroidery machine:
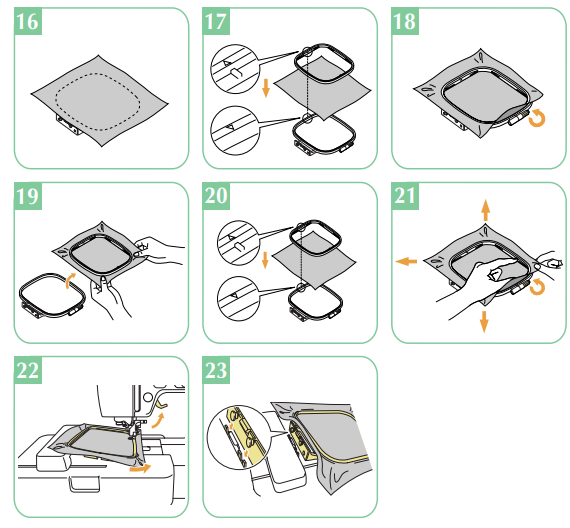
- Pull the metal tab
- Pull upwards on the plastic hoop to remove it
- Once it is off, push the tab up to bring up the foot.
- Slide the hoop off from under the foot
Do not move the arm, this can ruin the machine.
Loosen the screw until the top half of the loop comes off. Do not fully unscrew the screw.
Place the stabilizer sheet on the bottom half of the loop with the screw (This step is optional, but a stabilizer leads to higher quality embroiders and is less prone to failure.
Place the piece of cloth you wish to embroider on top , followed by the top half of the hoop.
Note: Make sure the arrow is on the top and not pointing towards the screw. If it is change the orientation of the top piece. Push in the plastic top part from the corners and gently tighten the cloth as you’re doing so. Once the top part of the hoop is fully in, tighten the screw.
Note: Make sure the piece of cloth is tightened evenly across the hoop and doesn’t have any creases. If the foot is down, push the lever up to bring the foot up.
Slide the hoop under the foot
Put the hoop in the arm. Push it in until it clicks into place. That’s it! Now the bed is ready
Loading a design onto the machine
Plug in the USB cable in into the back of the machine and connect the other end to your computer.
Open your design in the PE-Design software and go to the Home tab.
Click on Send > Send to Your Machine and then select the first option in that list.
Preparing your design
Click on the computer icon to access the designs you loaded from the computer.
Select your design from the screen. (NOTE: If your design does not show up, it means your design's parameters are too large. Go back to your design and adjust the size of it.)
Press on the pocket.
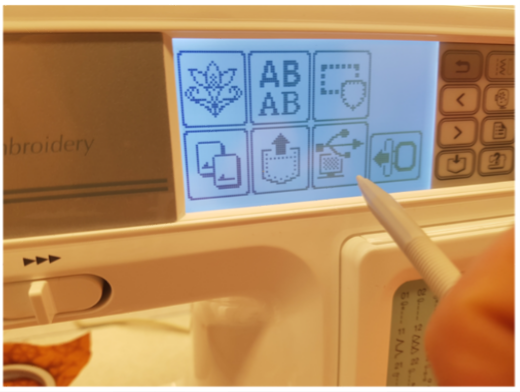
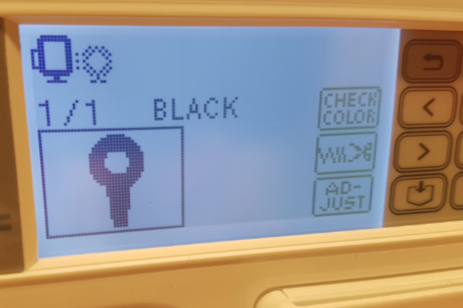
When you see this screen, it is ready to embroider.
Making Adjustments to Size and Position
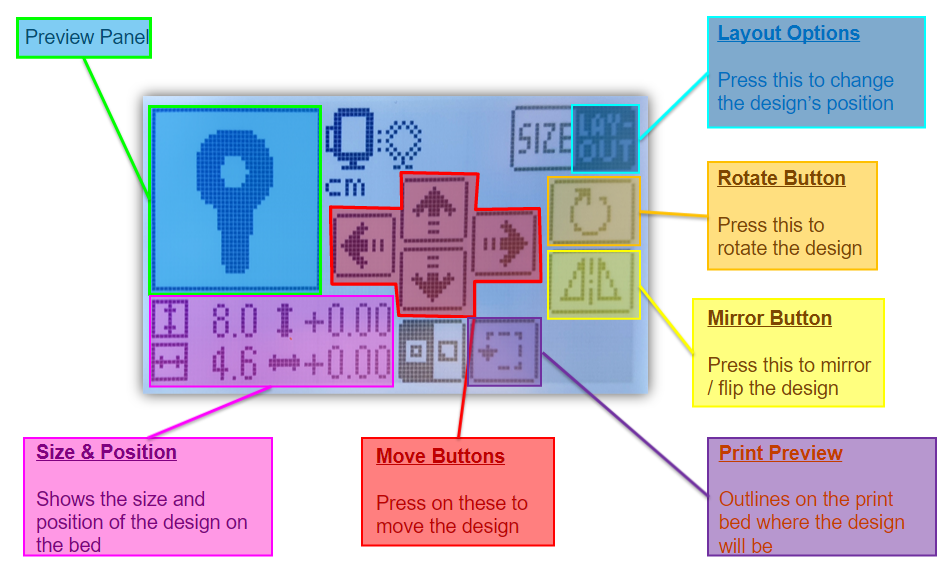
Press the Adjust button.
Then press the Layout button
Changing the position
Using the arrow keys you can easily change the position, rotate, or even mirror the desired design.
Changing the size
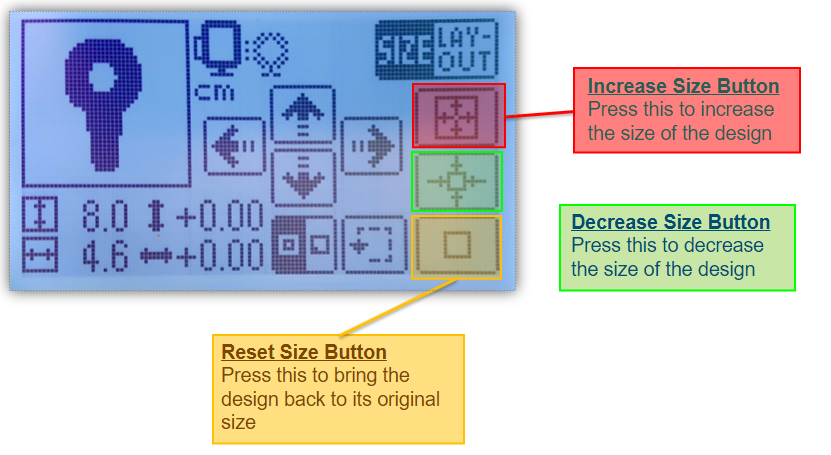
When you are done making the adjustments, press the back button until you are back to design screen with your design on it.
Push down on the lever to bring the foot down.
The ↑ (Go) button should now turn green. Make sure there is nothing around the embroidery machine and press it! The machine will now start embroidering!
Do not touch the machine while it’s operating.
- Very sharp needle moving up and down
- Mechanical parts are moving all over the machine, touching them will cause the embroider to fail.
Multi-Coloured Embroiders
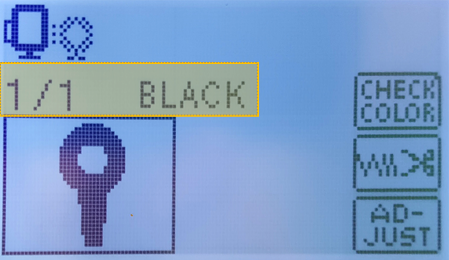
- If your design has different colours, you will need to rethread the upper thread with the next colour and hit the Go button again after lowering the foot.
- The machine will tell you which colour to embroider in what order on the screen:
Finishing up
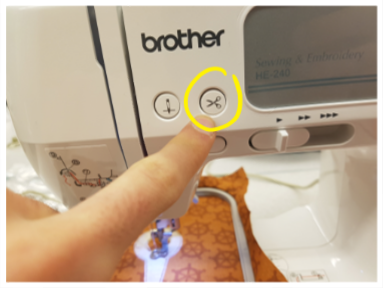
- When your design is finished embroidering the machine will tell you. Press okay then press then scissors button.
- Raise the foot.
- Remove the hoop from the machine
- Loosen the screw on the hoop and take your embroidered design!
Troubleshooting
Here are some common errors that might appear and how to fix them:
- Machine displays: “⚠ The bobbin thread is running out.”
- If the bobbin is empty: Refill the bobbin
- If the bobbin is full see: Thread the Bobbin
- Machine displays: “⚠ Check and rethread the upper thread.”
- If the thread spool is empty: Thread the machine
- If the thread spool isn’t empty: Thread the machine
- The needle Breaks: Replace the needle.
- Check the bobbin case for any burrs or holes that could have been caused by the needle. Sand those spots until smooth to ensure bobbin thread will not get caught inside the machine.
- Check to make sure the bobbin case is inserted into the machine correctly. The arrow on the bobbin case should align with the white dot on the machine.
Replacing the Needle
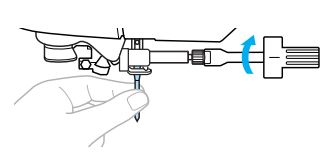
- Bring up the foot by pushing up on the lever. (Very important)
- Use the screwdriver found in the machine’s part bin to loosen the black screw that’s show. Do not fully unscrew the screw and beware of sharp points from the needle.
- Hold the needle with one hand and keep loosening the screw until you can pull the needle out. Make sure the needle does not fall into the machine.
- Now that the needle is out, you need to put in a new 75/11 embroidery needle. The flat end of the needle needs to be facing away from you when sliding it back up into the machine. (Same orientation as show in the image)
- Now that the needle is out, you need to put in a new 75/11 embroidery needle. The flat end of the needle needs to be facing away from you when sliding it back up into the machine. (Same orientation as show in the image)
- Make sure the needle cannot go up any further then tighten the screw.